1995 Plymouth Neon-ND
Phase II
Well, after my cooling off period, it was time to get back
in the game. Unable to decide what to do with my other, now destroyed,
project (CSX-ND), I knew I had to get something done. Thinking
at the time that it would be years until I'd get the CSX-ND fixed,
I pulled the engine out of it. This engine was a real workhorse,
and gave me many miles of smiles in the CSX. Well, I knew what
I had there, we'll use it! Hah! Easier said than done. To get
the Turbo III 2.2 DOHC engine to fit into a neon proved more
difficult than the SOHC engine. This, even with our experience,
and having all the mounts and wiring done. I pushed those guys
harder, and they were starting to really dislike me at this point
for doing so. I tossed the automatic in favor of an A568 5 Speed
manual. To make this thing work, we used a neon 5 Speed shifter,
and the A568 cables. Clutch operation was a slight problem, as
Neons use a different setup. Vic and Keith took a pedal set from
a Neon, and a pedal set from a Daytona, and made up a set that
would work. Vic said there was something like 40 hours in the
pedal setup alone! I believe it. Everything about this project
consumed lots of time, and even more $$$. Next, we dropped then
engine in, and found out quick that the right frame rail hit
the PS pump nicely. Eric told me to ditch to power steering.
No way. We got the torch out, and four grown men pounded and
bent things till it fit. We were all wiped out from that one.
Now it's in. Using modified 1990 Turbo IV electronics and the
distributor setup I developed for the CSX-ND, we got it running.
It ran well. It ran really, really well. Wow! Imagine over 300hp
to the ground in a package that was both light and nimble. But
it wasn't enough. I tossed the Neon's 18:1 steering rack in favor
of a rack from an 87 Shadow ES Turbo (Firm Feel Suspension) and
bolted it in place of it. This gave me the better 14:1 ratio.
I tossed those sorry Jamex sturts and springs, and put Koni ACR
struts and MP Neon springs. I put in poly bushings all the way
around the car. Now we had a serious handling and accelerating
car! Top this off with a GTS hood from ModernPerformance, and
it was starting to look like a real car too! I never got to the
track with the car like this, but should have. Only one or two
contests in it. Most notably the 99 Viper GTS I sent home in
a 'street contest'. Lots of witnesses nearly wet their pants
when seeing this happen. We figured the Viper owner had that
thing in for service Monday morning, wondering how a POS Neon
could possibly walk all over it. This bliss was of course to
end quickly. Soon the engine was smoking. Uh oh. Build another
short block, put it in. 1100 miles later, smoking. rings are
shot again. Re-ring it. 1500 miles later, smoking again. What
is going on???? Well, I should have guessed. Looking at the electronics,
the O2 sensor was reading beautifully. EGT's were not really
going along with it though. Reading 1100° under WOT, and
sometimes as low as 900° under cruise. I really should have
been paying better attention. It turns out, DO NOT EVER USE A
BOSCH O2 SENSOR!! EVER!!! They have some serious quality issues,
and despite using new ones everytime we tore the engine down,
they were reading leaner than the car actually was. This caused
the SBEC to add in more fuel, making it way too rich. This washed
the cylinder walls down in gasoline, which removes lubricating
oil. This in turn, burns up rings. Use ONLY MOPAR O2 SENSORS!!!!
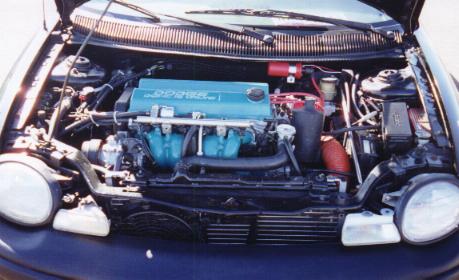
This chapter was now over. Here are the specs for this setup
(in addition or change to Phase I):
- 1991 Turbo III Block, Crank, Rods, Balance Shafts
- 1991 Turbo III Head, extensively ported
- TEC TA34/T4 Hyrbid Turbocharger
- 1990 Turbo IV/ND Performance Electronics
- ND Performance Turbo III Distributor
- A568 5 Speed Transmission
- Aluminum Flywheel
- Centerforce Dual Friction Clutch
- MP +40% Fuel Injectors
- Mexican Export Neon Radiator (all metal)
- Extra Cooling Fans
- More!
Page 4
BACK
|